
Making cookies can be a great way to work on OT skills with any child….
Holiday cookies are often the symbolic start of the holiday season…
When I was little the night that we made Christmas cookies was one of my favorite nights in the holiday season. Even today, my brothers and sister, and I crack up at certain songs or memories from when we were little. Making cookies was an important tradition for my family. In following that tradition, I had some bonding time with my nieces last night and we decided to start our holiday season by making some cookies. I thought I’d use some examples from our night to give you all some tips and tricks…
What kid doesn’t like to make cookies?
Hmm, well a child with sensory issues might not. And a child with poor motor skills who isn’t “good” at making cookies might not either. Then there are the children who have dietary issues or allergies that interfere with making and eating classic cookies. Luckily there are a lot of ways to adapt “cookie making” to make it a holiday activity that the whole family can enjoy.
Sensory
For sensory children who exhibit tactile defensiveness, cookie making can be a “persuasive” way to get their hands dirty. Sensory issues are not black and white and every child is different. As an OT, I think it’s important to desensitize children as early as possible. Often sensory issues can be confused with and/or turn into behaviors. As a parent, you have to use your judgment in regards to knowing your child and how far you can “push”. Also, you need to pick your battles. Cookie making should be fun, so you don’t want to end up in a fight or with a tantrumming kid. However, if you just “let it go”, the problem may not get better. You also don’t want your child “watching” as you make cookies or even worse, playing in the other room because they don’t want to be involved in such a “gooey” task.

Holding a cup and flipping it over is hard work for little forearm muscles…but great exercise!
Let your child pour, scoop or measure all the dry ingredients to start. If your child is old enough, have them read the recipe and figure out which measuring spoon, cup, etc., that they need. These are real-life skills! Kids don’t really get a chance to learn this kind of stuff in school. (Many middle school programs have a class called Family and Consumer Sciences, or FACS, where kids will have a few opportunities to cook). Dry ingredients are less “noxious” than wet sticky ones. Your child will get a chance to participate but doesn’t have to get all uncomfortable right away. You can start to push the envelope by having them pour or measure the “wet” ingredients into a measuring cup or bowl. They won’t mind touching the container, just the wet stuff inside. Cracking an egg always seems to be exciting, no matter how old the child is. Obviously, your chances of getting a “usable” egg with no shells, etc., will be slim, but plan accordingly and have your child attempt to crack an egg (or three) into a separate bowl. When you crack an egg, you have no choice but to get “gooey”, so this is a good chance to work on defensiveness.

My nieces were thrilled to be able to crack their first egg for our cookie making session…
Once your wet and dry ingredients are all in the same bowl, let your defensive child use a long-handled spoon to mix them. This is great exercise for the upper body, too. If you feel like pushing a little further, use a regular spoon. Your child will not be able to help but get some of the batter on their fingers. If they get upset, try to blow it off and make it “no big deal”. If there is a “ruin the night” tantrum on its way, get the bigger spoon. If even the long-handled spoon isn’t working, let your child wear small kitchen gloves or even large zip lock bags over their hands. The really “good” sensory work comes when you start to mix your cookie dough into one big ball. This requires a lot of sensory tolerance. Again, if you need to offer your child zip lock bags or gloves, go ahead. If you can get away with it, try not to.
Hand Strength and Dexterity, and Bilateral Coordination
Occupational Therapists often suggest using therapy putty or clay to work on hand strength, but why not cookie dough!? Cookie dough is softer than the usual putty materials, but there is also a much larger amount. It is much harder to “knead” a giant ball of dough than a little silly putty egg’s worth. Little hands can get tired fast. And for big kids, if they have weak hands, this is a lot of work.
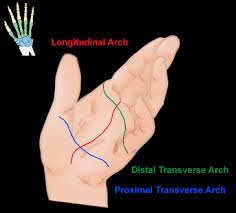
For children of any age, cookie making is a great way to work on intrinsic hand strength. Your intrinsic muscles are tiny muscles located in your palm and along your fingers that help you to grasp, release and manipulate small things. When you move your fingers away from each other or toward each other, those are your intrinsic muscles. Look at the palm of your hand where a “palm reader” would look. These lines are formed from the arches in your hand. You have groups of muscles that work together to get the hand to perform certain movements. Many children do not have good intrinsic hand strength.
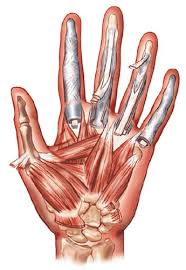
Look how tiny they are! It takes a lot of work to get those little guys strong. So get baking!
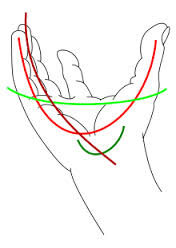
A child with weak hands and underdeveloped muscles will have trouble making a “cup” with their hand like this
(If you ask a child to roll a die and they can’t; they just throw it or drop it; it is usually because they can’t make a “cup” with their hand to keep the die in place. This is because the arches in their hands aren’t developed enough to make or keep the cup.)
Many, many children have poor bilateral skills. They want to leave their non-dominant hand hanging useless at their side while the dominant hand attempts to do the work. Alright, they don’t really want to leave it, they can’t help it or they don’t even realize they are doing it. Sometimes, due to poor strength or stability, a child tries to compensate by using their other hand to support a different body part. An example would be the child who always leans into their left arm on the chair while the right arm is writing or coloring. If the child has poor stability or postural control, they are relying on that arm to kind of “prop” their body. The child who always uses their hand to hold up their head probably has difficulty with poor postural control. Cookie making really involves both hands – pouring, stirring, and holding the bowl, using a rolling pin, etc. And that is before you even start working with the doh.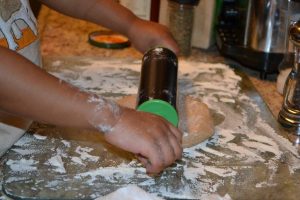
So enough of the technical stuff. But I am going to tell you a few ways to “modify” your cookie making activity so that you can get both of those hands as well as those intrinsic muscles involved.
1. Kneading dough into a giant ball – this works on both arm and hand strength. It increases endurance and builds the small muscles in the hands.
2. Scooping a round of dough – using utensils requires skilled movements with the forearms. The child with mature motor skills should be able to hold a spoon (like a shovel) dig into the dough, and get a nice scoop. Many children who do not have mature motor skills will hold the spoon incorrectly, which makes the whole task difficult. If you see your child doing this, just change the position of the spoon for them. Practice of good positioning can help form the habit.
3. Making a “Snake” – Don’t be afraid to ask your child to roll the whole ball into a snake (even if you don’t need a roll, they probably don’t know that). Get as much exercise as you can with this dough! Rolling with both hands can be tricky because they both have to roll at the same time, while pressing with the same force. So you are working on bilateral coordination and force modulation. (The child with poor sense of force is the one who always accidentally squeezes all the juice out of the juice box before getting a sip. They also squeeze an enormous blob of glue out of the container when they only need a dot.)
4. Cutting the snake with a knife – Children should start being exposed to using a butter knife or a plastic knife by at least the age of five. Most children aren’t, for obvious reasons. But if mom or dad is right there, it should be fine. Plus, using a knife (like a spoon) requires good forearm and hand skills. It can be very awkward the first time a kid tries to use a knife. Cookie dough is nice and soft, and all they really have to do is press down. If you are really looking to increase the hand strength, show your child this grasp below. This grasp strengthens the small muscles of the hands and the arches.

My sweet little niece having a great time slicing up her “snake”. This is a great grasp for increasing hand strength.
You may notice that your child switches back to a “fisted” grasp. This is normal. Those little intrinsic muscles get tired quickly.
5. Rolling out the dough – Using a rolling pin is great for bilateral skills and force modulation too. Plus, it’s oh-so-fun!
6. Rolling the dough into small balls – this is a great activity for building the arches in the hands and for using two hands together. If your child tries to make a ball against the table, show them how to do it in two hands. This provides double the exercise, plus it reinforces those bilateral skills.
7. Isolating one finger at a time – Certain cookies (lindser tarts are my favorite) require a “hole” or “imprint” in the middle for jam or whatever. Many children with poor motor skills have difficulty using one finger at a time. Using the thumb by itself is the easiest, and then the index. The rest of the fingers are pretty hard. This is a great time to work on remembering the names of each finger for your little guys.
8. Decorating or adding chips – Depending on what you want to work on with your child, you can adapt your decorating a million ways.
Pincer Grasp -If you want to work on using a pincer grasp (thumb and index only), have your child decorate the roll, (aka, the snake) by placing “spikes”, (aka chocolate chips, butterscotch chips, etc.) down the snakes back. Yes, they will blend in later when you make another giant ball, unless you decide to work on knife skills to cut the snake into rounds instead of using a spoon. You can also get crafty by using chips or sprinkles to decorate and make eyes, buttons, etc.
Pencil Grip – A) Grab your tweezers (clean, please) and have your child sort the colored sprinkles. Depending on your child’s age and level of skill this could be fun or it could be torture. See how it goes.
B) Give your child a toothpick and let them “poke” a letter into the cookie. “S for Santa, M for Mommy, etc.”)
9. Force modulation – use squeeze icing to let your child decorate. The smaller icings usually come in “gel” and they don’t really look great after you bake the cookies, but the kids have fun creating. Plus, it works on hand strength and force modulation to get the pressure right on the tube.
10. Bilateral Coordination -Using cookie cutters is great for working on two hands. Resist the urge to “clean the edges” away from the cutter for your child. Show them how! If they mess it up, oh well, roll it back into a ball, flatten it out, and try again!
11. Visual Motor Skills and Visual Perception – Try making a design on a cookie and then having your child copy it. Get them to draw it on paper after or before. You can make letters, shapes, or pictures. You can make faces, too. You can also help your child to make a design by creating a “connect-the-dot” by poking the holes with toothpicks for them. I did this with my nieces and they followed the design using our “color-sorted” sprinkles to make these cookies.


Any recipe can be modified and adapted to work on hand skills! Use these tips to guide you in helping your child work on areas that are hard for them while still having fun!
And have a great holiday!
~Miss Jaime, O.T.
| Happy Cookie making! |
| ~Miss Jaime, O.T. |
Trackbacks/Pingbacks